Merchant Console Sources and Keys Settings
The Sources and Keys section of the console is where you can view and edit all of the different sources that connect to your console. These include all of the internal system sources - such as the vTerminal or QuickSale - and any external sources - such as a Point of Sale system, Shopping Cart, eStore or Payment Form.
Each source is assigned a unique Key by the system which is used to identify the source of each transaction when it is processed through the gateway. You can also run reports using the Source as a factor in order to find out where the majority of your transactions originate. This page displays each source, its assigned key and whether that source key is disabled or includes a pin.
Adding a Source Key
To add a new source to the system and generate a key for the new source, click the Add Source button at the bottom of the screen. You will be taken to a page with several sections which are outlined below.
Enter the required information into the form(s) provided and click Apply when you are done. The system will automatically generate a key for the new source and it will be added to the source list. The process for editing an existing source key is similar, but any differences are detailed in the Editing a Source Key section below.
Source Info
 |
In the first form, enter the basic source information such as what the source will be named (we recommend that you use something descriptive and easy to remember, i.e. Toy Order Form, or P.O.S. Station 2), the pin number (if any) and whether the source should be disabled, or run in test mode.
Allowed Commands
 |
Next you will select the commands that the specific source will be permitted to process. This choice should be based on a number of possibilities, such as who will be using the source, how public it is, and any specific fraud modules you plan to add to the course once it has been set up. Below is a list of Commands and their Descriptions.
| Command | Description |
|---|---|
| Sale | process a credit card sale transaction |
| Credit | process a credit card refund or issue a customer credit |
| Void | void a specific transaction |
| Auth Only | process an authorization only credit card transaction |
| Post Auth | authorize a queued credit card transaction |
| Capture | capture a queued transaction |
| Check Sale | process an electronic debit/check transaction |
| Check Credit | issue a check credit |
| Payment Form | indicates whether this source will be using an online payment form (more details below) |
Email Merchant Receipt To
Provides space for email addresses to which receipts should be sent upcome completion of each transaction. You may include multiple email addresses, but they must be separated by a comma(s). (e.g. merchant@merchantemail.com, merchant2@merchantemail.com)
At this point you may choose to Save, Cancel, or Apply your changes, or, if the source you are creating/editing is a payment form, continue on and customize your payment form.
Payment Form Template
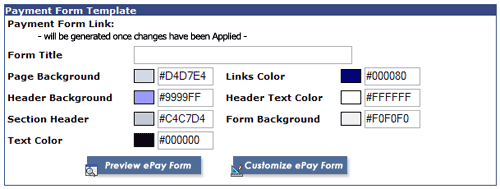 |
In this section you can create a title for your payment form, customize the appearance of the form and change any aspect of the form to make it work best for you and your business.
Once you have applied your changes, a link to the form will appear at the top of this section, however, you may use the Preview ePay Form button at the bottom of the section to view your changes at any time. From the preview screen, use your browser's back button to return to the source editor.
You can change the color of the form's background, header, section headers, text, links, header text and form background, by simply entering the hexadecimal color codes in the spaces provided. When selecting colors we recommend using a palate that coordinates with your website and is easy for customers to read. Click here for a complete hexadecimal color guide.
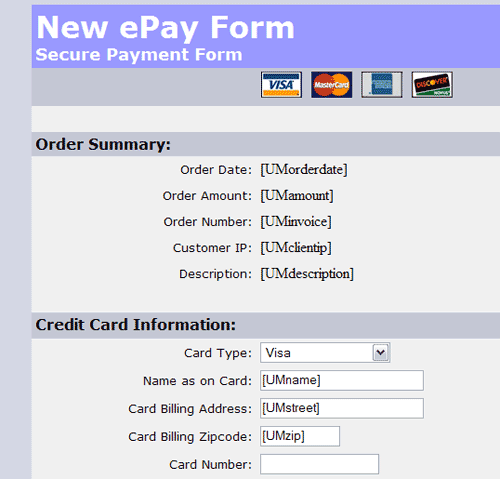
The default colors for the form are blues and grays as shown in the preview below:
 |
You can further customize both the form itself and the displayed result page by clicking the Customize ePay Form at the bottom right of this section. You will be taken to a tabbed html field, with one tab for the form, and the other for the result page. Any of the html can then be edited to your specifications.
The result code includes responses for multiple outcomes such as approved, declined, or unable to process.
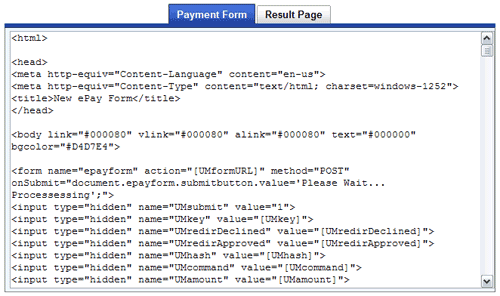 |
Please note: This option is recommended for experienced users only. If you want to customize your form, but are not sure of how to proceed, please contact your USA ePay sales representative.
Payment Form Settings
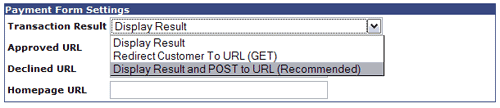 |
The payment form settings determine how the form transaction results are submitted, and where the customer is directed once they have clicked the submit button at the bottom of the form.
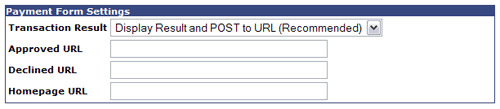 |
Approved URL: Enter the complete URL (include all parts of the URL beginning with "http://" - i.e. http://www.yourwebsite.com/approvalpage.html) of the page to which the customer should be redirected once their successful transaction has received approval from the gateway.
Declined URL: Enter the complete URL of the page to which the customer should be redirected should their transaction result in a decline.
Homepage URL: Enter the complete URL of the homepage of your existing website. This link will be used wherever a “Home” link is required.
Or visit the ePayment Form page to learn more.
Payment Methods
 |
In this section you can select the payment methods that will be accepted by this source. The options include: Visa, MasterCard, American Express, Discover, Diner's Club, JCB and e-Checks.
Declined Template
 |
The declined template field is only required is you are using a client-side API. The template must be entered here in html format and will be displayed to the customer if UMredirApproved is set but UMredirDeclined is not. There is no restriction on length. ”[reason]” will be replaced with a text description of the error.
Please note: The Declined Template is not a required part of the ePay Form. Most users will not need to use the Declined Template field.
Required Fields
 |
The required fields section allows you to determine which fields of your payment form must be filled in correctly before the form will be accepted. There are two drop down menus and one space for including a descriptive error message for your customers, should they skip a required field.
The Requirement menu allows you to choose from a list of specific requirements to ensure that your customer enters the information in the correct format. Possible requirements include:
-
Value Required - as long as something has been entered in the field it will be accepted.
-
Letters Only - allows only letters to be entered in the specified field, if other characters are entered (including spaces) in the field, it will be rejected.
-
Numbers Only - allows only numbers to be entered in the specified field, if other characters are entered (including spaces) in the field, it will be rejected.
-
Letters & Numbers Only - only numbers and letters are allows, no other characters such as @ or % will be permitted.
-
Letters, Numbers & Spaces - only letters, numbers and spaces will be permitted.
-
US Phone Number - only a valid US phone number will be accepted.
-
US Zip Code - only a valid US zip code will be accepted (may be used to prevent foreign order for merchants who do not ship overseas).
-
Canadian Zip Code - only a valid Canadian zip code will be accepted.
-
US or Canadian Zip Code - only a valid US or Canadian zip code will be accepted.
-
Custom - custom requirements may be set using perl regular expressions. This requirement may be used to ensure that customers enter information in an acceptable format, such as the common date format: DDMMYYYY.
 |
Once you have entered a required field, it will appear in the list above the drop down menus with a trash can icon to the far right. Should you need to delete or edit the required field, simply click on the trash can and the field will be instantly deleted. It can then be replaced with a corrected required field if desired.
 |
The following fields may be added to the required fields list:
-
Tax
-
Nontaxable
-
Tip
-
Shipping Amount
-
Discount
-
Subtotal
-
Customer ID
-
Invoice
-
Order ID
-
PO Number
-
Description
-
Credit Card Number
-
Credit Card Expiration Date
-
CVV2
-
Customer Email
-
Send Cust Receipt
-
Card Holder
-
AVS Street
-
AVS Zip
-
SSN for Checks
-
DL #
-
DL State
-
Clerk
-
Terminal
-
Client IP
-
Software
-
Recurring Billing
-
Amount
-
Schedule
-
Number of Transactions
-
Start Date
-
End Date
-
Billing Address
-
First Name
-
Last Name
-
Company
-
Street
-
Street 2
-
City
-
State
-
Zip
-
Country
-
Phone
-
Fax
-
Email
-
Website
-
Shipping
-
First Name
-
Last Name
-
Company
-
Street
-
Street 2
-
City
-
State
-
Zip
-
Country
-
Phone
-
Card Authentication
-
Auth Payload
-
XID
-
CAVV
-
ECI
-
Card Present Ind
-
Mag Stripe Data
-
Terminal Type
-
Mag Stripe Data Ind
Duplicate Transaction Handling
 |
The Duplicate Transaction Handling settings allow you to prevent fraud by catching similar or identical transactions occurring within a set period of time. However, if you are already using the Duplicate Detection fraud module, you must set the Source Duplicate Transaction Handling to “none.”
To set the Duplicate Transaction Handling to catch transactions first select either “Fold duplicate if ALL transaction data matches,” or “Fold duplicate if card number and amount match,” from the Handling drop-down menu. Then enter the time limit in the space provided, for example, if you set the handling to “Fold duplicate if ALL transaction data matches” and enter 5 minutes (the default), then any transactions with identical data that run within five (5) minutes of each other will be folded and run only once.
SOAP Interface
 |
This section provides a link and password to download and install an SSL certificate.
Please note: This setting is recommended for some users but is not required for most users.
Allowed IPs
 |
This setting allows you to restrict the number of computers on which this source key can be used. To allow all IPs to run transactions, leave blank. To specify only certain IPs, enter each permitted IP on a separate line in the space provided.
Granting only certain IPs permission to run transactions with this particular source key may prevent fraud.
Editing a Source Key
Click on the Edit button to the right of the source you would like to edit. All of the information in the table above may be edited.
Deleting a Source Key
Click on the Delete button to the right of the source you would like to delete. A window will open asking you to confirm this deletion.
Please Note: Once a source key has been deleted from the system, any software such as Wireless ePay, ePay Charge or third party shopping carts that was configured to use the source key will no longer be able to process transactions.